Blogger Templates

Saturday, December 31, 2011

Abracadabra - It's Magic!

I first had Magic Grapes at a friend's bachelorette party, and couldn't stop eating them!  Delish!  They are a super easy party snack - only takes a few seconds to make, just be sure to prepare them the night before!

Magic Grapes
1 bag (about 4 cups) seedless red grapes
1 small pkg cherry or raspberry Jell-O

1.  Place grapes and Jell-O powder in a Ziploc bag, seal, and shake until grapes are well-coated.
2.  Remove grapes and place them in another bag or on a baking sheet to avoid them sticking together (and getting super messy!)
3.  Freeze thoroughly.

Serve these frozen - just make sure there are napkins nearby!

Pizza-Pasta Bake

I was on my way home from work the other day, and realized my husband was gone for work and we had nothing prepared for dinner.  We generally keep our meat in the freezer so we didn't really have anything to make quickly.  I began brainstorming and remembered we had some pepperoni and always have most types of shredded cheese stocked in the freezer.  I checked when I got home and we also had pizza and pasta tomato sauces, but nothing to make a quick pizza on.  So I made up my own dish and made my pizza on pasta!  (I'm sure it's nothing new, but it was to me, and I didn't use a recipe - so this is my creation!)  I am going to put a combination of what I used and what I would recommend since I was using what was available in the freezer/pantry, but you could get larger amounts at the store.

Gretchen's Pizza-Pasta Bake 
Serves 8

1 pkg penne pasta (I used organic brown rice pasta - gluten-free!!)
2 1/2 c. tomato sauce (pizza or pasta sauce, I used a little of both)
2 1/2 c. shredded mozzarella (or other Italian) cheese (mine was a blend of provolone and mozzarella, and I also added some grated parmesan on top)
2 tsp minced garlic
1 tbsp Italian seasoning (could substitute oregano and/or basil, but I recommend getting some Italian seasoning anyway if you don't have it already - I use it on everything!)
1/4 tbsp crushed red peppers flakes (optional, adds spice)

1.  Cook pasta al dente, according to package directions.
2.  Toss the drained pasta with the garlic, seasoning, and pepper.
3.  In a 9"x13" casserole dish (prepped with nonstick spray), layer 1/2 of the pasta mixture.  Then layer 1/2 of the sauce, followed by 1/2 of the cheese.  Create an entire layer of pepperoni (so they cover most of the cheese without overlapping) on top.  Repeat all four layers with the remaining ingredients.
4.  Bake in a preheated 350 degree oven for about 25-30 minutes.
Step 3
Step 2


Step 4

Chocolatey Chocolatey Cookies :)

So I made both of these cookie recipes recently.  I'm actually not a huge cookie fan, but thought they were good, and the others who ate them raved about them.  (Mine did not come out looking like the pictures from the original recipes, so I am using their pictures so you can get a better idea.)  Pick your poison: Nutella or dark chocolate chip!

Nutella Chocolate Chip Cookies 
Nutella Chocolate Chip Cookies
Source: blog.al.com

2 c. all-purpose flour 1 tsp baking soda
1/2 tsp salt
1/2 c. butter (1 stick)
1 c. sugar
1/2 c. brown sugar
2 eggs
1-1/2 tsp vanilla
1/4 c. Nutella
1-1/2 c. chocolate chips

1. Preheat the oven to 375 degrees and prep baking sheets with silpats or parchment paper.
2. In a large bowl whisk together the flour, baking soda and salt.
3. Using an electric mixer, cream the butter, the sugar and the brown sugar. Add the eggs and the vanilla until combined.
4. Gradually add the flour until the mixture is combined.
5. Mix in the Nutella. Finally, add in the chocolate chips.
6. Use ice cream scoop (or just form balls) and drop on baking sheets and bake for 9-11 minutes.

Flourless Fudge Chocolate Chip Cookies
Source: chocolateandcarrots.com

3 c. powdered sugar
2/3 c. unsweetened cocoa powder
1/8 tsp salt
2-4 large egg whites, at room temperature
1 tbsp vanilla extract
1 1/2 c. dark chocolate chips

1.  Preheat the oven to 350 degrees and prep baking sheets with silpats or parchment paper.
2.  In a large bowl, whisk together the powdered sugar with cocoa powder and salt.
3.  Whisk in the vanilla and egg whites starting with just two.  Beat just until the batter is moistened. If it seems too thick, add another egg white, then a 4th one if it still seems too thick.  (I think 3 1/2 would have been best.)
4.  Stir in the chocolate chips.
5.  Scoop the batter (able tbsp-sized scoops) onto the prepared baking sheets.
6.  Bake for 12-14 minutes, until the tops are glossy and lightly cracked.  Allow to cool.

Sunday, December 18, 2011

Time for Take-Out ... in the Slow Cooker!

As you know, I am not a big fan of Asian foods; however, I do love orange chicken from Panda Express.  So, I have always been on the lookout for a recipe close to what I can buy.  Generally, what I've tried has come out too orangey.  I am sad to say it did again this time, but I was able to fix it.  I found the recipe on Pinterest from a great slow cooker blog and my husband made it with some rice.

Crockpot Orange Chicken

4 boneless, skinless chicken breasts, chopped into small chunks
1/3 cup flour
Olive oil
1/2 tbsp salt
1 tsp balsamic vinegar
3 tbsp ketchup
6 oz. frozen orange juice concentrate, thawed
4 tbsp brown sugar
Red pepper flakes, to taste


1.  In a bowl, mix the orange juice, brown sugar, vinegar, salt, and ketchup.  Note: If all diners enjoy a little spice, go ahead and add a tablespoon or so of the red pepper flakes.
2.  Pour the flour in a (separate) small bowl.  Coat the chicken breast chunks in flour and shake off the excess.
3.  Pour a small amount of olive oil in a skillet and brown the flour-covered chicken.  Note: The chicken does not need to be fully cooked since it is going in the crockpot.
4.  Place the cooked chicken pieces into the crockpot.  Cover with your sauce mixture and give the pot a stir.  Cook on low for 5-6 hours or on high for 2-3 hours.
5.  Serve over rice and even add your favorite veggies if desired.  Season with red pepper flakes to desired taste.  

(This recipe is quite acidic because of the amount of orange juice used, so I definitely recommend serving with rice to absorb some of that acid!)

Saturday, December 17, 2011

O-H-I-O

Having grown up in central Ohio, candy buckeyes are a favorite holiday treat of mine!  Many know them as "chocolate-covered peanut butter balls," but I find that unacceptable!  They are made to look like real buckeyes (a poisonous nut).  We like to make them for big (Ohio State) Buckeye games, but they are also a Christmas tradition for many.  You won't see a holiday bake sale in Ohio without them!  When I was little, a lady from my church would have me over every year to make buckeyes before Christmas.  They are pretty much my favorite thing in the world.  I have been sick all week and peanut butter seems to be something my stomach can handle - and I have been craving buckeyes!!!  I was finally feeling well enough today to get up and make these bad boys!

Ingredients (note: vanilla not pictured)
Best-Ever Buckeyes!
Makes 4 dozen

18oz peanut butter (in my opinion, JIF creamy is the only way to go)
3.5 cups confectioner's (powdered) sugar
1 stick butter, melted
1 tbsp vanilla
12oz milk chocolate chips
1/4 bar of paraffin wax (chopped or shaved for quicker melting)

Texture of peanut butter mixture
(yes, I used a red bowl on purpose -
 GO BUCKS!)
1.  Mix peanut butter, sugar (begin with about 2 cups and keep adding until it begins to appear dry and
almost crumbly), butter, and vanilla together in a bowl until well blended.  Optional: Refrigerate for about 30-60 minutes to make the mixture easier to mold.
2.  Roll peanut butter mixture into 1" balls and place on a parchment-lined baking sheet.  Place sheet in refrigerator or freezer while preparing the chocolate to help the balls harden for easier dipping.
3.  Melt chocolate and wax in a double boiler.  Remove peanut butter balls from freezer.
4.  Using a toothpick (or longer wooden skewers) pierce each ball, one by one, and dip into the melted chocolate, swirling until 3/4 coated.  You want to leave some peanut butter showing at the top to give the appearance of a real buckeye.  Place each ball back onto the parchment to
harden.
5.  Allow to cool in the refrigerator.  Serve chilled.
Peanut butter balls!

In my pictures, I used my finger to smooth the peanut butter and remove the toothpick hole to make them look more like the nut.  These make great gifts - you could individually wrap them, or layer them in a festive tin.  No time to make them before Christmas?  No worries!  You can enjoy them on January 2nd as you cheer on the Buckeyes in the Gator Bowl :)
ENJOY!!

ready to share!!
the finished product

Sunday, December 4, 2011

ABC Chicken

Amazing Balsamic Caprese Chicken that is!  This was the easiest dinner ever - it's elegant and delicious.  Perfect for a dinner party.  I'm a sucker for some great fresh mozzarella, but normally eat in on bread - hadn't thought of this amazing chicken idea!  My husband marinated it and I did the rest - we didn't use a recipe and neither of us measured, so I will give suggested measurements, but feel free to do what seems right.  Sorry - that's really my style of cooking; I just like to play around with flavor!  We served it with a caesar salad and roasted potatoes, but it could also be great as a sandwich on some thick toasted bread.  Hope you enjoy it as much as I did!

Amazing Balsamic Caprese Chicken
4 boneless, skinless chicken breasts
balsamic vinegar (2 tbsp)
olive oil (2 tbsp)
crushed/minced garlic (1 tbsp)
fresh mozzarella (4 1/4" slices)
fresh basil (8-12 large leaves)
tomato (4 1/4" thick slices)
panko breadcrumbs (optional - 3 tbsp)
balsamic glaze (to taste, about 2 tbsp)

1.  Place first 4 ingredients in a large ziploc bag.  Allow to marinate (in fridge) for a few hours.
2.  Remove breasts from bag and place in a baking dish.  If using breadcrumbs for added crunch, place about 1/2 tbsp evenly on each.
3.  Bake about 30 minutes in a preheated 350 degree oven.
4.  Remove from oven.   Top each chicken breast with cheese, basil, and tomato.  Sprinkle remaining panko crumbs on top.  Return to oven for an additional 5 minutes.

5.  Drizzle glaze overtop and serve.

(See below for potato recipe.)

Potayto, Potahto.

I love red roasted potatoes, but they generally have too much rosemary for me.  So, I adapted the recipe and added more of my favorite spices.  Result?  Totally fabulous!!!


Red Roasted Potatoes
(adapted from marthastewart.com)

2 lbs baby red potatoes, quartered
2 2/3 tbsp olive oil
1 tsp dried rosemary
1 tsp dried oregano
1 tsp dried basil
salt and pepper to taste

1.  Place potatoes on a rimmed baking sheet.  Toss with oil and spices, then spread in a single layer.  Sprinkle with salt and pepper.
2.  Roast in a 425 degree oven (stirring once halfway) for about 30 minutes until potatoes are soft inside with a crisp outer layer.

AMAZING Gluten-Free Pizza!!! :)


So I found some gluten-free bread mixes in my cupboard and thought I'd put them to use!  I'm a feta fanatic, so I decided on a spinach feta pizza.  It was fabulous!  I'm sure I'll be making it again and again!  I actually went ahead and made a pepperoni pizza as well - it was pretty average.  Pizza is the best thing to play around with - it's hard to go wrong!  Feel free to experiment, but here's what I did (adapted from http://allrecipes.com/Recipe/spinach-feta-pizza/detail.aspx, which includes a regular dough recipe):


Spinach Feta Pizza

Dough:
1 pkg. Chebe gluten-free bread mix
2 eggs
4 tbsp milk
2 tbsp olive oil
3/4 c. freshly grated parmesan cheese (optional, but highly recommended!!)

Topping:
  • 1 garlic clove, minced
  • 1/8 tsp garlic salt
  • 2 c. chopped fresh spinach
  • 1 small red onion, chopped
  • 1 c. shredded mozzarella cheese
  • 1 c. crumbled feta cheese
  • 1/2 teaspoon dried basil

  • 1. Mix dough ingredients as recommended on package.  Flatten with a rolling pin (I don't have one, so I improvised with a glass - it worked just fine).  It should form a 12" circle, about 1/8" thick.  Pinch the edges to create a small crust.
  • 2.  Sprinkle garlic and garlic salt evenly on dough.  Spread the mozzarella, then spinach, then onions.  Top with the feta and finish with basil.
  • 3.  Bake in a preheated 375 degree oven for about 25 minutes, until crust is golden.  

  •  

Sunday, November 27, 2011

La Comida Mexicana

King Taco
So, it's nothing fancy, but I had heard great things about King Taco, and being the big Mexican food fan I am, I wanted to try it!  My husband and I are beginning a Sunday Lunch Club with some other couples from our church (which is located right in the center of tons of great restaurants!).  Many of us work on Sunday afternoons so don't have much time, and each couple includes at least one grad student, so we like to eat cheap!  So you won't see us at five star restaurants, but who eats at those all the time anyway?
I would classify King Taco as "fast food," even though there is no drive-through.  It's somewhere in between Taco Bell and Chipotle, in my opinion.  Our food was ready incredibly fast and the prices were decent.  The taste left a little to be desired.  I had a friend who couldn't handle how spicy it was - and I like spicy, but agreed it was a bit overdone.  Except for it being cheap, fast, and convenient, I doubt I would choose to go again.

Garlic Parmesan Mashed Potatoes

This is my go-to mashed potato recipe.  It came from my mother-in-law, but I tweaked it a little.  My husband and I made dinner together every year for our dating anniversaries.  This was part of our meal our 1st year!  We were having a caesar salad, so I decided to add some of the parmesan cheese to our potatoes and chicken dish, too.  These were a big hit for Thanksgiving and are a prefect compliment to almost any meal!

Garlic Parmesan Mashed Potatoes
6 medium potatoes, peeled and quartered
4-5 garlic cloves (I use 6 - I like garlic!)
5 c. water
Salt and pepper to taste
Freshly grated parmesan cheese to taste (I think I used about 1/4-1//2 c.)

1.  Place the potatoes, garlic, and water in a medium saucepan.  Bring to a boil.
2.  Reduce heat.  Cover and allow to simmer for 20 minutes, until tender.
3.  Drain water, reserving 2/3 cup of the starchy cooking liquid.
4.  Add the reserved water back into the potatoes and mash until the desired consistency is reached.
5.  Season with salt, pepper, and cheese.

Serving note: I'm not a gravy fan, so I can't tell you how well they go with gravy, however, most people ate it with gravy on Thanksgiving, so it must have been fine!  I normally drown my potatoes in butter, but I actually think the parmesan eliminates the need for that fattening friend!  (Also, I only put it in the crockpot to keep it warm during our Thanksgiving dinner - you do not actually cook it in a slow cooker.)


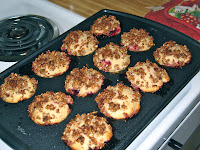
Leftover Cranberry Sauce Muffins!

So I mentioned in the cranberry sauce post that I made extra (tweaked with a little cinnamon) and put it in muffins last year.  Well, I had lots of extra sauce this year, so I tried to use some up in muffins :)

Use any basic muffin mix/recipe (see below).  Generally, you fill the muffin tins 2/3 full, so for this, I just filled them 1/3 full, put a little cranberry sauce in the middle of each (about 1 cup total, between 12 muffins), and then topped with the remaining muffin mix.  I then created my own granola topping for the muffins (see below).  You could simply mix the cranberry sauce into the muffin mix, but I wanted the gooey surprise in the center!  I also considered making it in the same way, but in a round cake pan - like a coffee cake (if someone tries it that way, let me know how it goes!).  I drizzled some melted butter with cinnamon and brown sugar mixed in overtop the muffins before serving (I like the more moist texture).  My husband loves these muffins - we hope you do too :)

Basic Muffin Mix
Source: Betty Crocker's Picture Cook Book
Makes 12 medium muffins

2 c. flour
1/4 c. sugar
3 tsp baking powder
1/2 tsp salt
1/4 c. shortening
1 egg
1 c. milk

1.  Mix first four ingredients together in medium bowl.
2.  Add in remaining ingredients and mix until a smooth batter is formed.
3.  Fill greased muffin cups 2/3 full.  (See above for different instructions for this recipe.)
4.  Bake at 400 degrees until golden brown, approximately 20 minutes.

Granola Topping
Could also be baked on its own and eaten atop yogurt, or however you might enjoy it!  
Note: I honestly just used several things I had laying around in my pantry, so feel free to add/remove/change anything based on what you already have.  The muffins in my picture look a little bare, so I am doubling the amount of topping I made for this recipe.
2/3 c. oats
2/3 c. cornflakes, crushed (I used honey-flavored, organic, gluten free cornflakes)
2 tbsp chopped candied almonds
1/2 tsp sugar
1 tsp cinnamon
1/4 tsp pumpkin pie spice
2 tsp honey (I used organic amber honey)
2 tbsp orange juice
1 tbsp cranberry juice
2 tbsp fruity yogurt (I used Yoplait Light, strawberry-flavored)

*Just place atop muffins in pan before baking for a crispier topping, or halfway through for a sweeter taste.


Monday, November 7, 2011

Best-Ever Biscuits!

I am not always the biggest fan of biscuits.  They tend to be somewhat crunchy; I prefer softer breads.  I found this recipe recently (from http://monstermama-monstermama.blogspot.com, but she got it from another blog...) and thought it seemed pretty easy so I gave it a try:

7-Up Biscuits
Makes 9

2 c. Bisquick
1/2 c. sour cream
1/2 c. 7-Up
1/4 c. melted butter

1.  Preheat oven to 450 degrees.
2.  Cut sour cream into the Bisquick mix, then add 7-Up.  Mix until well blended and forms a soft dough.
3.  Pat out dough (on parchment or Bisquick-sprinkled surface) to form a square.  Cut into 9 even squares.
4.  Pour melted butter into a 9" square baking pan.  Place individual biscuits on top of melted butter.
5.  Bake 12-15 minutes, until golden brown.

How did it turn out?  Fabulous!  My husband immediately wanted to make sure I saved the recipe and would be making them again soon.  I actually made a batch the next morning for Sunday school.  The best part is that they have butter baked in, so you don't really need to add anymore!  They would be great with a jam, or just plain next to your Thanksgiving dinner!  Enjoy :)

(pictures to come)

Cranberry Classic

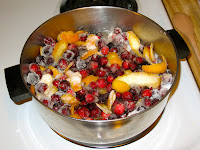
So, in deciding what to write for my first food post, I figured I should do my favorite Thanksgiving recipe, since it's almost that time!  I got married last summer and moved across country, so I had to do Thanksgiving dinner solo.  We had a friend over - he made the turkey (as you might have read, I don't do anything with bones) and I made everything else.  The hit of the night was my cranberry sauce.  I grew up with what we called "the real kind" aka the canned kind, but wanted to make my own.  I found this recipe in The Easy-to-Use Beginner's First Cookbook and will be making it every year from now on!  (In fact, my husband and his friend have even requested it throughout the year!)  It's super easy and is sure to be the talk of Turkey Day.  Here it goes:

Cranberry Sauce
Serves 6
(Cal: 178; Sug: 46.8g; Fat: 0g; Sod: 5mg)

1 orange
8oz cranberries
1 1/4 cups sugar

1.  Pare the rind thinly from the orange.  Remove any pith.  Squeeze the juice.
2.  Place the orange juice and rind into a medium saucepan.  Add the cranberries, sugar, and 2/3 cup water.
3.  Bring to a boil, stirring until the sugar dissolves.  Simmer for 10-15 minutes.
4.  Remove the rind and allow to cool before serving.

I made a second batch of this (with less orange, and 2 cinnamon sticks added while cooking) after the holiday weekend, and used it in muffins.  I mixed up a basic muffin mix from scratch and filled the cups 1/3 full, then placed some of the cranberry mixture, another layer of batter, and topped with some homemade cinnamon granola.  Delish!

Let me know how much your family loves this recipe this Thanksgiving!!